
Installing and Configuring Proxmox on a Protectli VP2420
My objective was clear: disable Secure Boot and ensure the system would boot from the USB drive.

Setting up a homelab is not just about the technology; it's about the pursuit of knowledge, the challenge of problem-solving, and the satisfaction of building something with your own hands. For me, the journey began with a clear goal: to create a versatile and robust environment for managing my network and experimenting with various virtual machines and services. After much consideration, I chose the Protectli VP2420 and Proxmox VE as the cornerstones of my setup.
The Hardware: Protectli VP2420
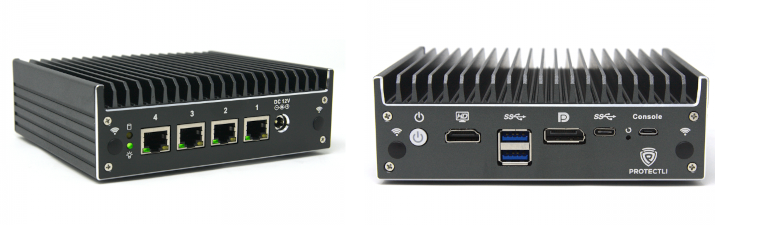
From the moment I unboxed the Protectli VP2420, I was impressed by its solid build and compact design. The hardware specifications were exactly what I needed for a powerful and efficient network management solution.
- CPU: Intel® Celeron J6412
- RAM: 16GB
- Storage: 500GB 2.5" SSD
- Networking: 4x 2.5G Ports
The combination of a capable Intel Celeron processor and ample RAM was perfect for handling multiple virtual machines. The four 2.5G network ports provided the flexibility I needed to segment and manage my network traffic effectively. However, like any new project, there were initial concerns. Would the setup be as straightforward as I hoped? Would I encounter unexpected challenges? These questions lingered in my mind as I prepared to dive in.
The Installation Process
Preparing for Installation
Every successful installation starts with thorough preparation. I began by downloading the Proxmox VE ISO from the official Proxmox website. Using Rufus, I created a bootable USB drive—a step familiar to many, yet always requiring a bit of caution. My first attempt was thwarted by a corrupted USB drive, but a quick switch to a new one resolved the issue. Not my first, and most definitely not my last reminder to always have at least a "Plan C"
Configuring the BIOS
Entering the BIOS of the VP2420 felt like stepping into the control room of my new project. To access the BIOS, I pressed DEL during startup. My objective was clear: disable Secure Boot and ensure the system would boot from the USB drive. Navigating through the BIOS settings was mostly intuitive, though I encountered a few unfamiliar options. With some quick research, I ensured the correct configurations were set, paving the way for the next step.
Installing Proxmox VE
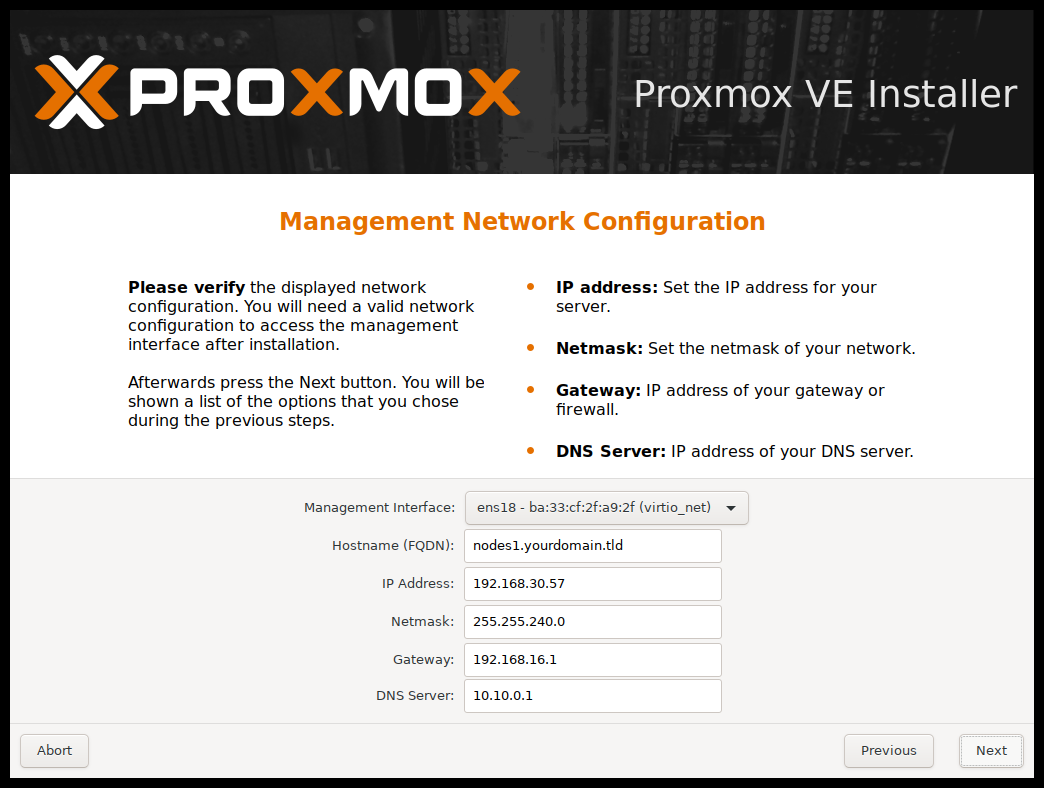
With the BIOS configured, the installation of Proxmox VE commenced. Booting from the USB drive, I followed the straightforward on-screen instructions. Opting for the default settings, I selected the 500GB SSD as the target drive, configured the network settings, and set a root password. Each step was documented meticulously to avoid any potential pitfalls. The installation proceeded smoothly, culminating in the moment I logged into the Proxmox web interface for the first time.
Post-Installation Setup
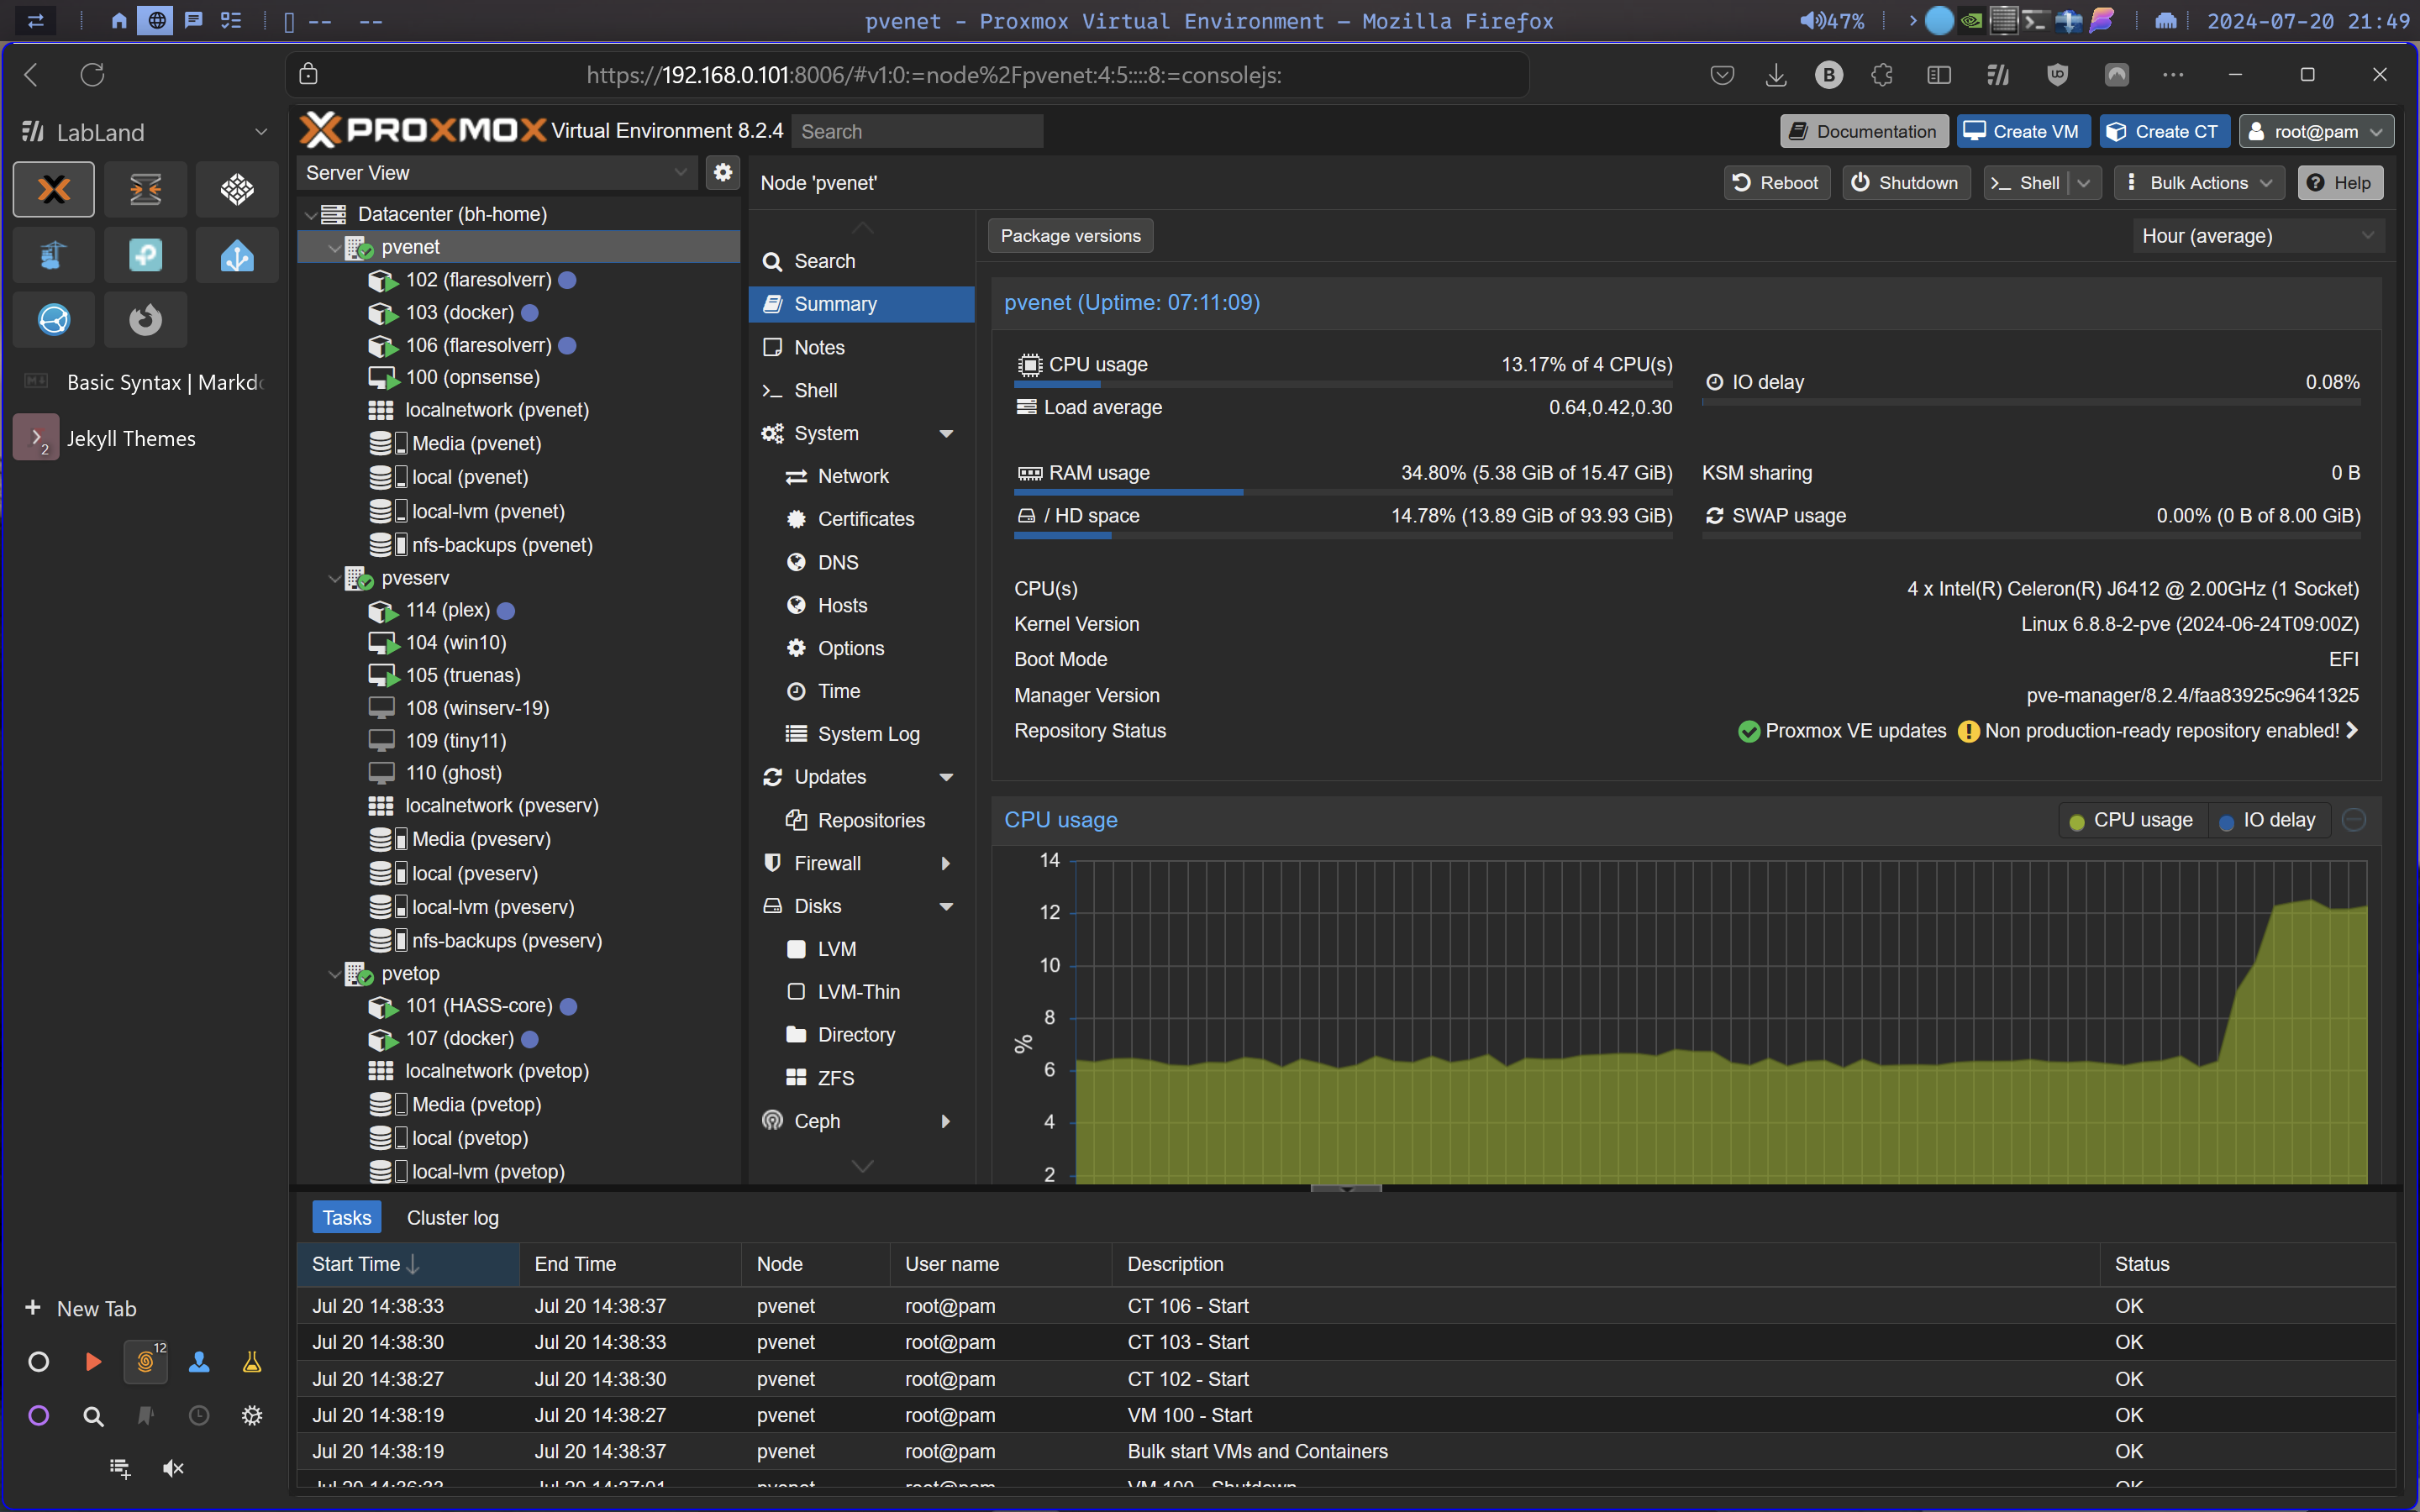
The first login to the Proxmox web interface marked a significant milestone. The clean, intuitive interface made it easy to navigate and perform the initial configurations. My priority was to update the system, ensuring it had the latest features and security patches. Using the command line, I executed:
apt update && apt dist-upgrade
This essential step guaranteed the system's security and stability. Following the updates, I utilized a collection of bash scripts called Proxmox Helper Scripts, compiled by a GitHub user tteck. These scripts automated many of the post-installation tasks, such as disabling the subscription nag and changing repositories to non-subscription ones.

(It's worth noting that while these scripts are widely used and trusted in the Proxmox community, it's always a good practice to review any third-party scripts before running them on your system.)
With these optimizations in place, my Proxmox environment was primed and ready for the next exciting phase: setting up my first virtual machine for network management.
Configuring the Network Management VM
Setting Up OPNsense
The decision to use OPNsense for my network management VM was based on its robust feature set and strong community support. Creating the OPNsense VM in Proxmox was a straightforward process. I downloaded the OPNsense ISO and created a new VM in Proxmox, allocating sufficient CPU, RAM, and storage resources. After attaching the ISO, I booted up the VM and followed the OPNsense installation guide. The initial setup included configuring the WAN and LAN interfaces, which would later play crucial roles in my network setup.
Configuring VLANs and Firewall Rules
Setting up VLANs was a critical step in organizing and securing my network traffic. I created several VLANs, each serving a specific purpose: management, guest, IoT, and more. Configuring these VLANs in OPNsense involved assigning the correct interfaces and setting up DHCP for each VLAN.
Firewall rules were next. My goal was to implement a robust set of rules to control traffic between VLANs and ensure security. This process involved a fair amount of trial and error, as I tested and refined the rules to achieve the desired balance between security and functionality. The use of an inverted destination rule to "allow access only to the internet" was a particularly effective strategy, allowing for granular control over device access.
Challenges and Solutions
Every project has its challenges, and this one was no exception. One of the significant hurdles was understanding the routing within the VP2420 itself. The concept of internet traffic bypassing the primary OS and going directly to the OPNsense VM, which then acted as the gateway for the entire network, was initially confusing. However, with some research and patience, I was able to configure the routing correctly.
Another challenge was the initial setup of VLANs and firewall rules. It took several attempts and a lot of troubleshooting to get everything working smoothly. Documenting each step and change was crucial in identifying what worked and what didn't.
Tips and Lessons Learned
Reflecting on this journey, there are several key takeaways:
- Documentation is Key: Keeping detailed notes on each step and configuration change can save a lot of time and frustration.
- Start Simple: Begin with a basic setup and gradually add complexity. This approach makes it easier to troubleshoot issues as they arise.
- Community Resources: Leverage community forums, guides, and tutorials. The collective knowledge of others who have tackled similar projects is invaluable.
- Patience and Persistence: Complex setups rarely work perfectly on the first try. Patience and a methodical approach to troubleshooting are essential.
Conclusion
Setting up Proxmox on the Protectli VP2420 has significantly improved my home network management. The flexibility and control it offers are unparalleled, and the experience has been a valuable learning opportunity. Looking ahead, I plan to expand my homelab further, exploring new services and configurations to enhance my network even more.
I hope this guide has provided some insight and inspiration for your own homelab projects. Remember, the journey is just as important as the destination. Happy tinkering!